


 2018-12-29
in
2018-12-29
in

 7 min read
Okay I’m obviously over excited about the fact that something which I knew should work actually did work. However all the previous API usages were on servers on the local machine, not behind an HTTPS link, and not being shared with the rest of the fediverse. This one breaks through that barrier. I have therefore decided to document it in excruciating detail. For the first pass all of these interactions were manual using cURL and FireFox RESTClient plugin . The next step, which will be coming up very shortly, will be creating the very first server to use this for a real purpose (I’ll document that as that happens). This document goes over the nitty gritty details of the whole authentication piece. The next article will go into the calls themselves. If you don’t care about the nuances of the authentication steps then just skim or skip this and go to the Part 2 . So without further ado, here we go…
The API can be thought of as an programmatic view into the Diaspora world from the perspective of a user that has given whomever is using the API permissions to view certain things. In order to do that the application needs to ask Diaspora for permission to do stuff. Diaspora needs to ask the user to confirm that they want to give this application permission to do so. If all of that checks out then the application will be given a temporary unique token that it can use for interacting with the API through those allowed permissions. All of those intricacies of that are being driven by standard workflows specified in OpenID and OAuth2 . The real nitty gritty details of that are also for a later time but suffice it to say that there are several steps a piece of software that wants to use the API has to go through before it can make a request. Let’s look at those steps:
Application Registration
Before an application can go through the process the very first thing it needs to do is to register with the server. There is a specific API endpoint for registering a new application with the server. The application passes in a bunch of information but in a bare minimum view take a look at the below JSON code which gets sent to the server via an HTTP POST method:
Method: https://hanksdiasporadevtestpod.com/api/openid_connect/clients
Data:
{
  "client_name": "ExampleApp2",
  "redirect_uris": [
    "http://example2.com/"
  ]
}
Assuming the server liked your request it will respond back with a bunch of application unique information that will be important for the next step: Response Data:
{
    ...
    "client_id":"7022a39772c64077a22b635044447861",
    "client_secret":"a3e0887a097f46e78068f42eaadf7d8aa3e0887a097f46e78068f42eaadf7d8a",
    "client_name":"ExampleApp2",
    "redirect_uris":[
        "http://example.com/"
    ],
    ...
    "created_at":"2018-12-29T01:36:53.734Z",
    "updated_at":"2018-12-29T01:36:53.734Z"
}
Notice the ellipses. There are many more fields than this but these fields are important to highlight. First, you see that the client name and the redirect URIs are the ones that were passed in the request. These will be important later since if these don’t match up when your application makes a request it will be rejected. Notice the two really long fields called client_id and client_secret. These are going to be important for when it’s time to make requests as well. We don’t want any app to steal our privileges. Therefore these along with the redirect URIs are going to be important in authenticating the request and passing around tokens which grant apps permission. All of this is part of the OAuth2 and OpenID process standards. NOTE: these are not my test application’s values, these are random values. The client IDs, secrets, and tokens are very sensitive pieces of data that should be guarded carefully.
Getting Permissions
Now that we have our application registered with this server our application is ready to make a request for permissions from the user. For this to work it’s going to send this link to a browser that the user is logged into Diaspora on. It is smart enough to ask the user to log in if they are not. However the important thing is this logged in process. The server can figure out by itself it the request is okay by matching up things like the redirect URIs. It can’t know if the user is okay with the application having those permissions. The URL that gets passed to a browser by the app looks like this (formatted with carriage returns for readability):
http://hanksdiasporadevtestpod.com/api/openid_connect/authorizations/new?
    response_type=code
    &scope=openid+contacts:read+contacts:modify+conversations+interactions+notifications+private:read+private:modify+public:read+public:modify+profile+profile:modify+tags:read+tags:modify+profile
    &redirect_uri=http%3A%2F%2Fexample.com%2F
    &nonce=d7e0a55993ca48e2a7a9663ff1f2a08d
    &client_id=7022a39772c64077a22b635044447861
This is the beginning of what’s called the OpenID Authentication Flow
which can be seen described in an overview here by OneLogin
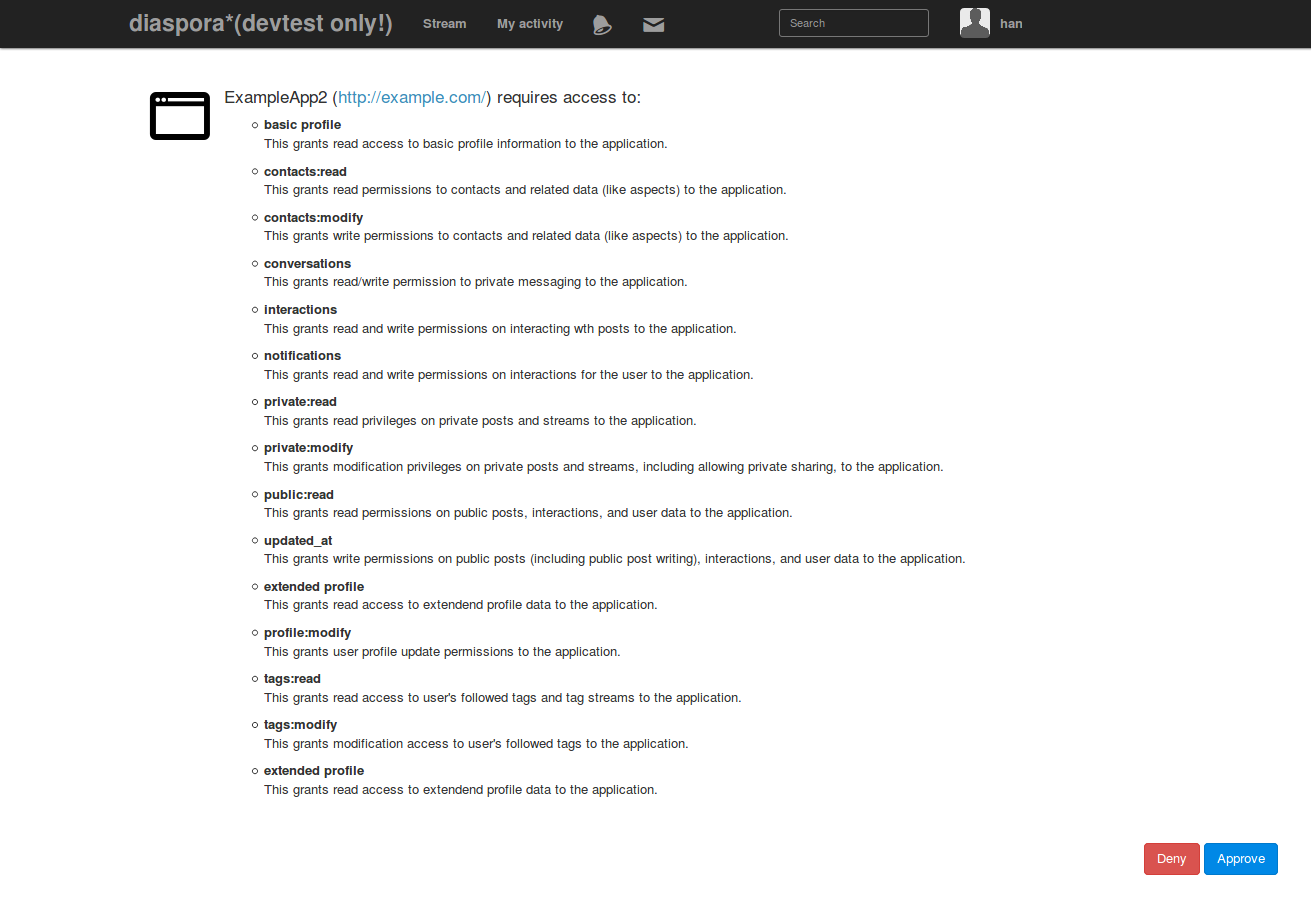
. You notice some fields we saw above: the client ID and the redirect URI (processed into a URL-safe form). You see some new ones there too. The first is the response_type. Setting that to code tells the Diaspora authentication endpoint that we are going to be doing this Authentication Flow. There are other choices but the overall point is that the response type drives what types of tokens are returned to the calling server and what it has to do with them. The nonce field is a random piece of data generated by the server. This is going to be passed around in other authentication steps and can be used to by the application organization’s servers to prove that the authentication requests are coming from their application and not a bad actor somewhere in the chain. The scope field are all of the things that the application is asking for permission to see and do for the user. Diaspora has many individual permissions that are unlocked by these various scopes. The application can ask for as little as one to all of them and the user can see what is being requested but it must ask for each of them explicitly. When the user’s browser passes this to the Diaspora pod it sends back a form asking the user if they accept or reject the request, see below. Note that this is a per-pod and per-user activity.
Assuming the user allows the app a response will be sent to the server whose URI was passed in. That’s why it was so important for all of that data to be consistent. Part of that data will be a code which the application’s servers will need for the next phase: actually getting a permission token.
Getting tokens
Okay so new the application’s servers have a code that they can use with other data to get an actual permission token. The Diaspora API has a specific endpoint for doing that stage as well, again all part of the OpenID Authentication Flow specification. The specific request looks like this:
https://hanksdiasporadevtestpod.com/api/openid_connect/access_tokens?
    grant_type=authorization_code
    &code=733129e3658348c98a44d2391b2e6d72924e33b8adc14e228c802115aac6c2d9
    &redirect_uri=http%3A%2F%2Fexample.com%2F
    &client_id=7022a39772c64077a22b635044447861
    &client_secret=a3e0887a097f46e78068f42eaadf7d8aa3e0887a097f46e78068f42eaadf7d8a
So again we see a bunch of familiar pieces: redirect_uri, client_id, client_secret, and the code that was passed back from the previous step. If any of these pieces don’t line up the Diaspora API authentication will not generate an access token for the application. It means something went wrong somewhere in the process. Assuming all of this is correct however the endpoint will return the access token and some other data:
{
    "access_token":"d003c9589a1f4406bb87dc9583009243d003c9589a1f4406bb87dc9583009243",
    "refresh_token":"f9f75c5a141440bca941a032b5221eee9c391ab23aa1478eb81a8aa83c6ce99e",
    "token_type":"bearer",
    "expires_in":86399,
    "id_token":"ZjdhNWI5ZDIxY2ExZGJiMjg4YzIwMDg0...ZTU2Nzg2ZjkwM2M0YTVmOTJjYjY0N2Y5"
}
Now we are really in business. The access_token field is a token that can be used to start working with the API right away. This token will be passed as part of each call to the API that is made. Based on the token the Diaspora API can determine which user this token applies to, which scopes the application has, and from the scope data whether that application has the right to make the request that it did. You notice however that this also has an expires_in field as well. The issued access tokens don’t live forever. This particular one is good for 86399 seconds, or essentially 24 hours. After that period if an application makes a request using it the request will be rejected since the token will no longer be valid. This is again a security measure. With the Authentication Flow however the application is also given a refresh_token. An application can use this refresh token to request a new access token from the Diaspora API when its previous token is expired. Because we now have our access token it’s time to move on to the next big step: actually using the API. See Part 2
for that step.