


 2019-05-10
in
2019-05-10
in

 6 min read
As I wrote in my Avalonia Hello World (On Linux) article I’ve made more progress than just executing the canned auto-generated Hello World. I’ve actually been through their one official tutorial and then some. You can find it on their website here . It will walk you through the steps of making a simple proof of concept “To Do List” application which shows you all of the steps of creating a simple application, adding controls, creating reactive controls, and how the Avalonia System works. It has two paths. One for those using Visual Studio on Windows and another for those using the .NET Core command line tools. Since I’m sticking with the whole doing everything on Linux thing I’m using the latter.
NOTE: This article is from 2019 and Avalonia has been under active development and improvement since that time. Please consult newer tutorials and documentation for how to use this against current releases of Avalonia.
The steps in the tutorial are actually pretty spot on. There were a few small hiccups, which I’ve initiated my first Avalonia-related Pull Request to fix. I’m going to go over the macroscopic steps at a very high level, linking to each of the stages in the main manual and only showing differences from it as necessary. The tutorial is self guided so there is no need to follow my links to follow along, I’m just providing them for reference to what I’m wirting about. Some of the differences I highlight will be corrected in the above pull request if it is accepted. However I’m attempting to use JetBrain’s Rider IDE for my IDE so there are a couple of extra steps for that which will persist beyond that PR.
Create Project
The first step is to create the project, as listed on the first section . This step is pretty straight forward. Just like in the Hello World article above we are simply executing one command:
dotnet new avalonia.mvvm -o Todo -n Todo
Just like with the original this creates a full directory project file structure to allow you to start working with your Avalonia project:
└── Todo
    ├── App.xaml
    ├── App.xaml.cs
    ├── Assets
    │   └── avalonia-logo.ico
    ├── Models
    ├── nuget.config
    ├── Program.cs
    ├── Todo.csproj
    ├── ViewLocator.cs
    ├── ViewModels
    │   ├── MainWindowViewModel.cs
    │   └── ViewModelBase.cs
    └── Views
        ├── MainWindow.xaml
        └── MainWindow.xaml.cs
Create Solution and Open In Rider
An addendum to the first page is to create a solution and load it into Rider. We do this in three simple steps:
cd Todo
dotnet new sln
dotnet sln Todo.sln add Todo.csproj
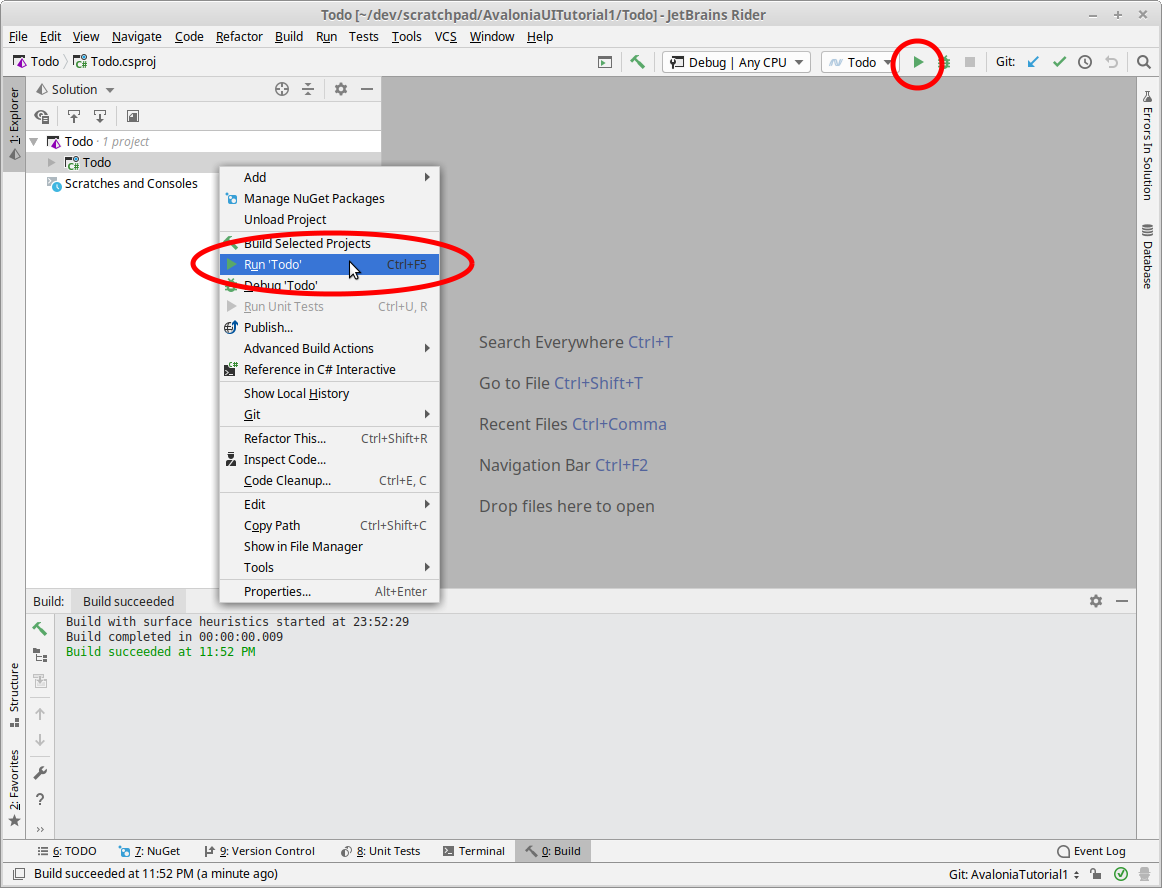
First we jump down into the directory with our project. Next we tell dotnet to create a solution file in that directory. It will pick up the name Todo automatically so in the end you’ll have a Todo.sln file. However the CSPROJ project file won’t be added to it. We add it to the project with the last command. At this point we are now ready for Rider. Launch Rider and choose the Open Solution or Project option if presented with the “Welcome to JetBrains Rider” screen or if it launches into a full window by choosing the File -> Open -> Solution or Project... menu. Select the SLN file. Rider will then start reconstructing the project, pull in the NuGet dependencies and so on. Once the project is loaded you can now build it and run it. Build it the first time manually by choosing the Build -> Build Solution menu option. You can then run by clicking the Run Icon or using the right-click menu on the project (highlighted in red below).
Avalonia App ready to run in Rider (run actions highlighted in red)
Create the TodoListView
The second part of the tutorial is where we start doing new stuff. We are creating our first new view which will hold our To Do List. You can find that tutorial section here
. The tutorial says that the created source files are going to have a namespace called Todo.Views. This is only correct if you specified the -n Todo argument when you run it. If you don’t specify that then it uses the default nmespace. That name is AvaloniaAppTemplate.Namespace. So for example in the TodoListView.xaml file the tutorial says it should look like this:
<UserControl xmlns="https://github.com/avaloniaui"
             xmlns:x="http://schemas.microsoft.com/winfx/2006/xaml"
             xmlns:d="http://schemas.microsoft.com/expression/blend/2008"
             xmlns:mc="http://schemas.openxmlformats.org/markup-compatibility/2006"
             mc:Ignorable="d" d:DesignWidth="800" d:DesignHeight="450"
             x:Class="Todo.Views.TodoListView">
    Welcome to Avalonia!
</UserControl>
You will get this if you specified the option but if you forgot it will look like this:
<UserControl xmlns="https://github.com/avaloniaui"
             xmlns:x="http://schemas.microsoft.com/winfx/2006/xaml"
             xmlns:d="http://schemas.microsoft.com/expression/blend/2008"
             xmlns:mc="http://schemas.openxmlformats.org/markup-compatibility/2006"
             mc:Ignorable="d" d:DesignWidth="800" d:DesignHeight="450"
             x:Class="AvaloniaAppTemplate.Namespace.TodoListView">
  Welcome to Avalonia!
</UserControl>
It’s very subtle but it’s the last line of the UserControl definition that reads x:Class="AvaloniaAppTemplate.Namespace.TodoListView" that is wrong. It should read x:Class="Todo.Views.TodoListView". In the TodoListView.xaml file you will see the same string. This is something to remember whenever you are creating new controls through the dotnet tool. Specifying the namespace is very important. You will have to go through and replace the default template string with the actual namespace name.
Remaining Steps
The remaining steps execute exactly as spelled out. To complete the exercise one:
- Creates a Model and View Model
- Wire up the Views and the View Models . This step actually has what appears to be magic happening as Avalonia “on its own” figures out how to map a View and View Model just by naming conventions. It’s more complicated than that and is extensible to use Dependency Injection and the like. The next section on locating views spells it out. I actually spent half an hour or so stuck in this step trying to figure it out and then when moving on to the next section had the tutorial explain for me what I had already discovered.
- Add the feature of being able to add items to the To Do list. This actually occupies two parts of the tutorial. The first is about prepping the new view. The Second is about wiring up the buttons and all of the data flows.
In the end you’ll have an app that has a list plus the ability to add items. I tested the code running on Windows as well as Linux and the results are pretty similar:
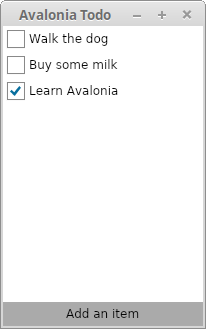
To Do App Running on Linux Mint MATE
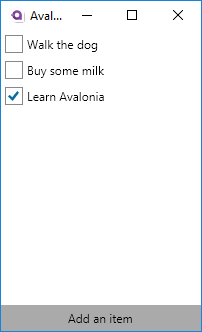
To Do App Running on Windows 10
Conclusions
After all of that I have a pretty decent tutorial in the bag and a bunch of things I’ve learned about Avalonia. I was overall impressed with the project. That’s why I’m starting to contribute to working on documentation, became a monthly fiscal contributor, and am planning on using this for some desktop app projects that I’m looking forward to. Much of the manual was spot on. The changes that I created the pull request for should get it even closer. Some things are still rough around the edges, like the template. I have another blog post with deeper thoughts on Avalonia in general but so far this is the best .NET based truly cross platform system I have found yet. However overall it’s a big thumbs up for me.