


 2019-06-18
in
2019-06-18
in

 11 min read
Tree Views are a standard control for looking at hierarchal data in a user interface. Avalonia has a TreeView Control
as well. In this tutorial we are going to go over creating a TreeView control for a league roster system. This is based on a similar tutorial written for WPF by Mike Hillberg that you can find here
except that we are skipping the manual list aspects of it. As an FYI, I’m doing my work in JetBrain’s Rider IDE
so screenshots and instructions will be from there but this obviously works with any editor. You can find the final solution for this blog post in this Gitlab Repository
.
NOTE: This article is from 2019 and Avalonia has been under active development and improvement since that time. Please consult newer tutorials and documentation for how to use this against current releases of Avalonia.
Getting Started
Let’s start with the simplest step, creating a backing data model and the corresponding TreeView Component. First, create a new project using the steps in Getting Started
:
dotnet new avalonia.mvvm -o TreeViewTutorial -n TreeViewTutorial
cd TreeViewTutorial
dotnet new sln
dotnet sln add TreeViewTutorial.csproj
Now let’s look at creating our data model. Thinking about the most basic hierarchy of a sports league we have at the top level the entire league. A league would be made up of divisions or conferences. Each conference in the league would be made up of teams. So if I were to look at this hierarchally it’d look something like:
├── Conference A
│   ├── Team 1
│   └── Team 2
└── Conference B
    ├── Team 3
    └── Team 4
So for each level we will want to track a name and for the conference we will want a collection of Teams. Let’s create our basic model classes. In the Model folder create a Conference.cs file and a Team.cs to capture these classes. We will use the ObservableCollection type for collection type since we are wiring it into a Reactive UI. These classes will look like:
namespace TreeViewTutorial.Models
{
    public class Team
    {
        public string TeamName { get; set; }
    }
}
using System.Collections.ObjectModel;

namespace TreeViewTutorial.Models
{
    public class Conference
    {
        public string ConferenceName { get; set; }

        public ObservableCollection<Team> Teams { get; }
            = new ObservableCollection<Team>();

    }
The top level conferences will be held by our ViewModel in MainWindowViewModel.cs:
using System.Collections.Generic;
using System.Collections.ObjectModel;
using TreeViewTutorial.Models;

namespace TreeViewTutorial.ViewModels
{
    public class MainWindowViewModel : ViewModelBase
    {
        public ObservableCollection<Conference> League { get; }

        public MainWindowViewModel()
        {
            League = new ObservableCollection<Conference>(FillLeague());
        }

        private List<Conference> FillLeague()
        {
           //Fill league data here...
        }
    }
}
We will create a fictuous league for our tutorial directly here versus using a backing store of some sort. Our initial FillLeague method looks like:
private List<Conference> FillLeague()
{
    return new List<Conference>()
    {
        new Conference()
        {
            ConferenceName = "Eastern",
            Teams =
            {
                new Team()
                {
                    TeamName = "Eastern Team A"
                },
                new Team()
                {
                    TeamName = "Eastern Team B"
                },
                new Team()
                {
                    TeamName = "Eastern Team C"
                }
            }
        },
        new Conference()
        {
            ConferenceName = "Western",
            Teams =
            {
                new Team()
                {
                    TeamName = "Western Team A"
                },
                new Team()
                {
                    TeamName = "Western Team B"
                },
                new Team()
                {
                    TeamName = "Western Team C"
                }
            }
        }
    };
}
With our ViewModel data ready we can look at what this looks like in a TreeView. Let’s create our simplest Window by just having a TreeView bound to our ViewModel’s League data:
<Window xmlns="https://github.com/avaloniaui"
        xmlns:x="http://schemas.microsoft.com/winfx/2006/xaml"
        xmlns:vm="clr-namespace:TreeViewTutorial.ViewModels;assembly=TreeViewTutorial"
        xmlns:d="http://schemas.microsoft.com/expression/blend/2008"
        xmlns:mc="http://schemas.openxmlformats.org/markup-compatibility/2006"
        mc:Ignorable="d" d:DesignWidth="600" d:DesignHeight="450"
        Width="600" Height="450"
        x:Class="TreeViewTutorial.Views.MainWindow"
        Icon="/Assets/avalonia-logo.ico"
        Title="TreeViewTutorial">

    <Design.DataContext>
        <vm:MainWindowViewModel/>
    </Design.DataContext>

    <TreeView Items="{Binding League}"/>
</Window>
If we run this out of the gate we get the following in our application:
Avalonia TreeView Initial View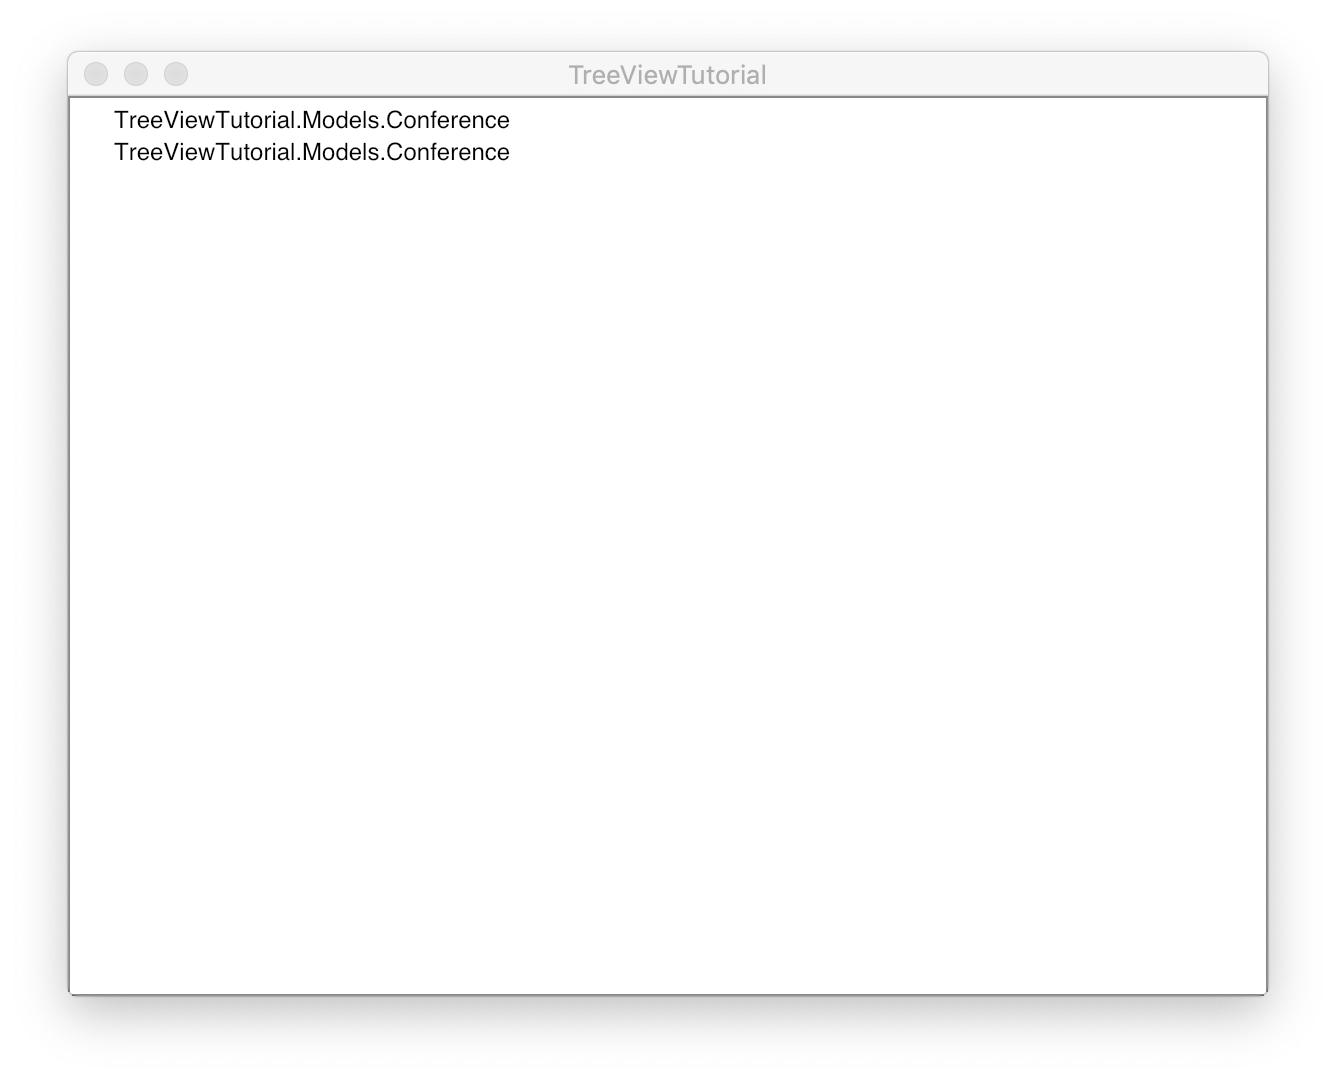
So that’s not exactly satisfying is it? Yeah we have our top level leagues but it obviously doesn’t know how to present it. We also aren’t seeing the teams underneath each league. The problem is we haven’t told it how to present our items. Let’s do that with some data templates. The TreeView control has a property called DataTemplates where we define the data templates for our items. Let’s look at a modified version of the above
|
|
As we can see we have two data templates for our two types. We use the DataType keyword to give Avalonia a hint of which type each template is to be applied to. In the case of the Team class (lines 22-24) it is just like our previous examples you may have seen. We are going to write a TextBlock whenever the control is trying to render a Team object. In the case of the Conference however we need to tell it about the children object. In this case this is the Teams property on a conference. Therefore in its definition (lines 19-21) we use a TreeDataTemplate not DataTemplate. This is is similar to the HierarchicalDataTemplate class in WPF. It has the additional ItemsSource property that we need to tell it about our hierarchy. Inside the block we define what we render for the current level of the hierarchy before Avalonia iterates on the children items. The above therefore creates the view we originally were wanting:
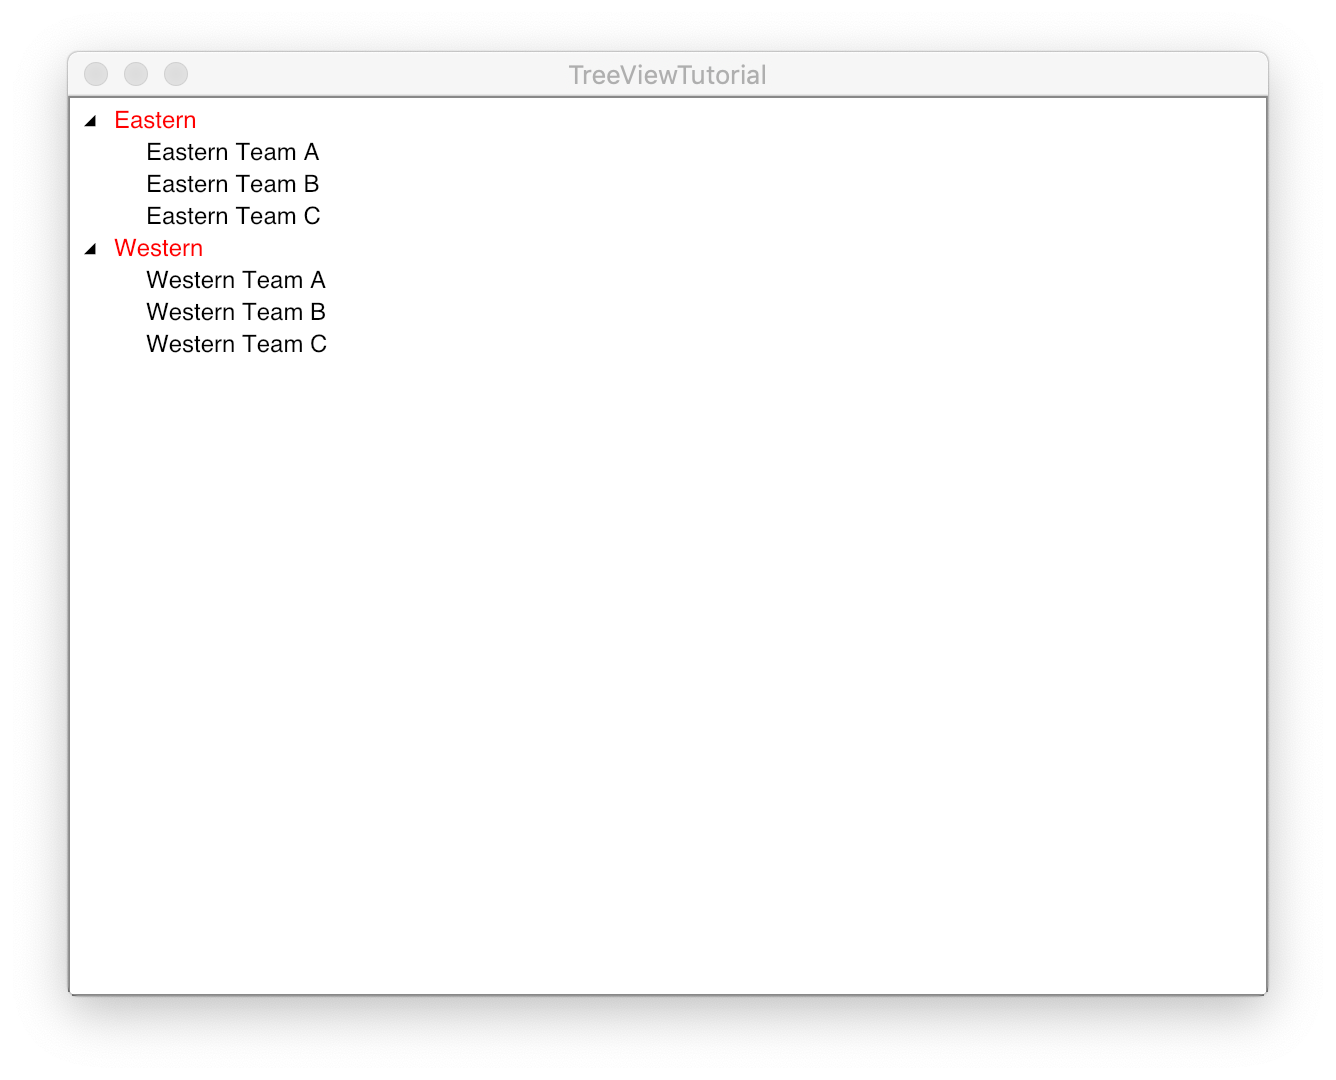
Avalonia TreeView Initial Working View
Adding More Hierarchy
Alright, let’s say that we really want to look at the league information one layer down. Let’s say that we want to be able to explore the players on the team. We just need to continue the hierarchy as we have previously in the Model and then tweak the corresponding data templates. Let’s make a simple Person class that stores a name:
namespace TreeViewTutorial.Models
{
    public class Person
    {
        public string Name { get; set; }
    }
}
…and we will add an ObservableCollection of Person objects called Players to our Team:
using System.Collections.ObjectModel;

namespace TreeViewTutorial.Models
{
    public class Team
    {
        public string TeamName { get; set; }

        public ObservableCollection<Person> Players { get; }

        public Team()
        {
            Players = new ObservableCollection<Person>();
        }
    }
}
We will punch up our initial collection code to add some players to some teams:
return new List<Conference>()
{
    new Conference()
    {
        ConferenceName = "Eastern",
        Teams =
        {
            new Team()
            {
                TeamName = "Eastern Team A"
            },
            new Team()
            {
                TeamName = "Eastern Team B",
                Players =
                {
                    new Person() { Name = "Player 1"},
                    new Person() { Name = "Player 2"},
                    new Person() { Name = "Player 3"}
                }
            },
            new Team()
            {
                TeamName = "Eastern Team C"
            }
        }
    },
    new Conference()
    {
        ConferenceName = "Western",
        Teams =
        {
            new Team()
            {
                TeamName = "Western Team A"
            },
            new Team()
            {
                TeamName = "Western Team B"
            },
            new Team()
            {
                TeamName = "Western Team C"
            }
        }
    }
};
Now let’s look at the data templates. As we described previously we are essentially telling Avalonia how to render each type of data we are presenting. We will therefore change our templates so that the Team data template is a TreeViewDataTemplate so we can tell it that it has children to render, and then create a new DataTemplate for the Person object.
<TreeView.DataTemplates>
    <TreeDataTemplate DataType="models:Conference" ItemsSource="{Binding Teams}">
        <TextBlock Foreground="Red" Text="{Binding ConferenceName}" />
    </TreeDataTemplate>
    <TreeDataTemplate DataType="models:Team" ItemsSource="{Binding Players}">
        <TextBlock Foreground="Green" Text="{Binding TeamName}" />
    </TreeDataTemplate>
    <DataTemplate DataType="models:Person">
        <TextBlock Text="{Binding Name}" />
    </DataTemplate>
</TreeView.DataTemplates>
Notice that we aren’t creating hierarchical templates per-se. The hierarchy is a function of the way the objects are structured in their parent/child relationship. Each data template only cares about its own specific hierarchy which is:
- “This is what Avalonia supposed to present for this object”
- “This is what Avalonia binds to for potential children objects of this object”
The new XAML creates the following view, with the additional hierarchy for teams that have players. You notice that for teams that don’t have players listed there is no arrow indicating a lower hiearchy. That’s because, probably obviously when put that way, because there is no hierarchy.
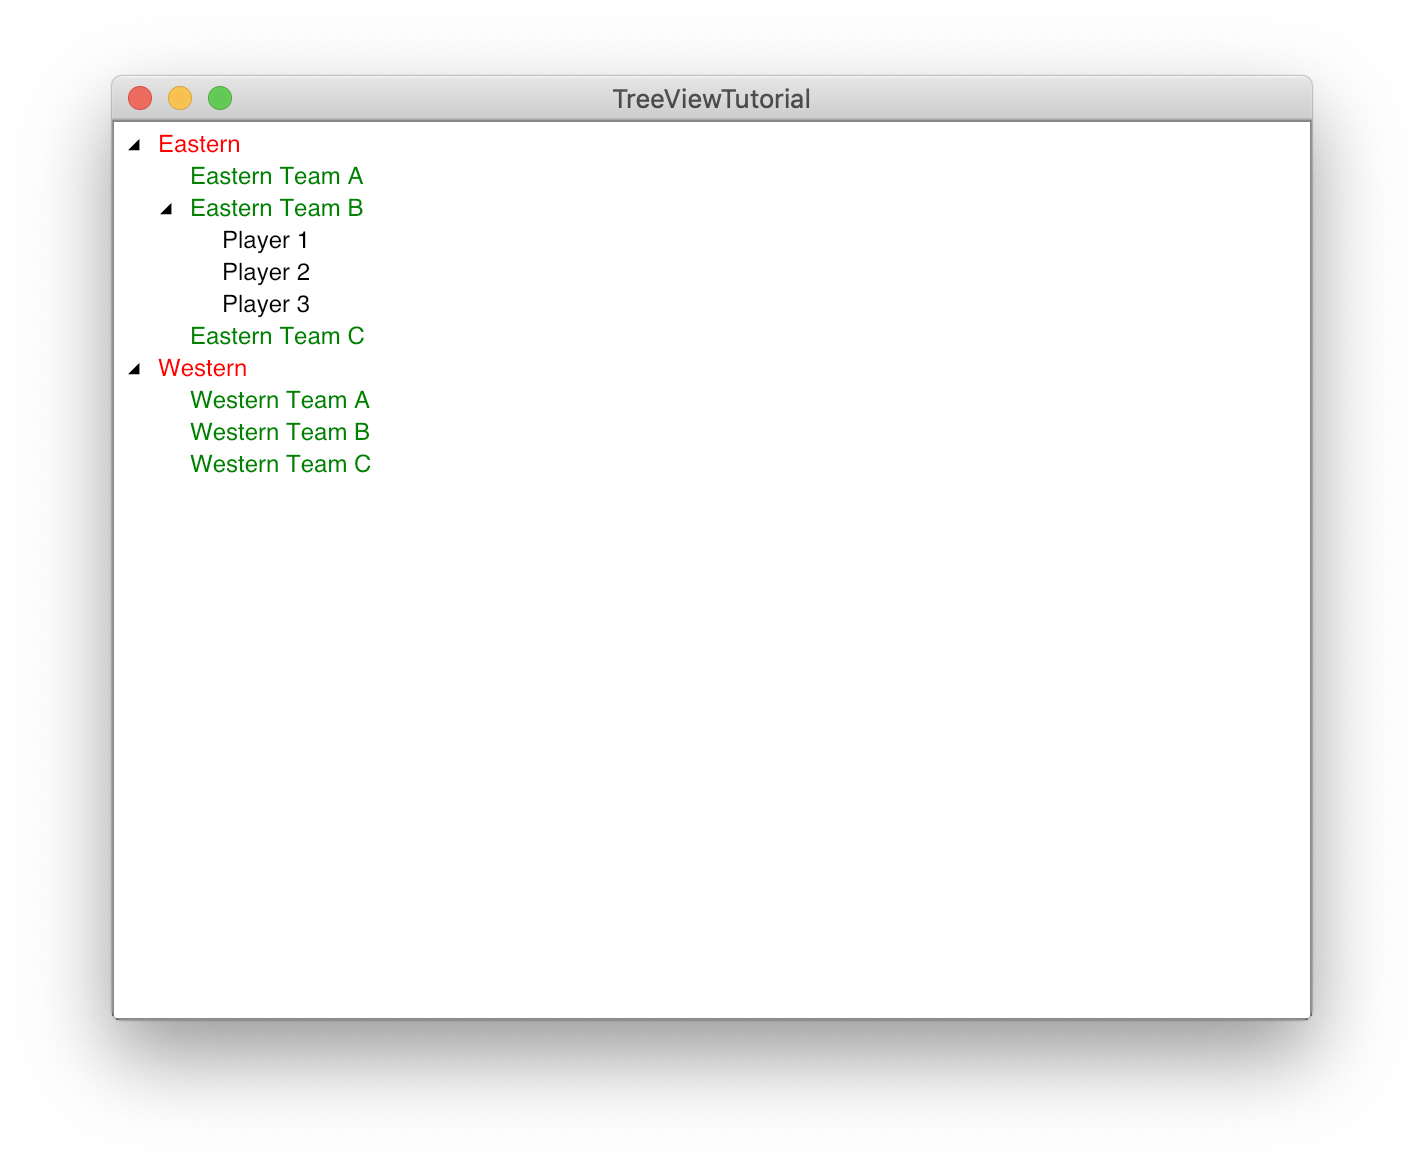
Avalonia TreeView with two layers of hierarchy
More Complex Hierarchy
Let’s say that we wanted to go into even more depth. Let’s say that we want to look at the composition of the coaches and the players. For each player we want to list their positions and for each coach we want to have their title and to output their proper name in the UI. One idea you may have is to have a second data structure named Coaches with a type Coach and change the Players data structure to have a new type called Players. The Coach would have a Title property and a ProperName property for their full name and the Player will have a list of positions. That would look something like:
public class Team
{
    public string TeamName { get; set; }

    public ObservableCollection<Coach> Coaches { get; }

    public ObservableCollection<Player> Players { get; }

    public Team()
    {
        Players = new ObservableCollection<Player>();
        Coaches = new ObservableCollection<Coach>();
    }
}
It’s totally reasonable looking but we have a problem. Remember how we bind the data with the TreeViewDataTemplate and specify the collection in question. For each type we specify the template and which property to bind the items collection to. So the XAML for above would need to look something like this:
<TreeView.DataTemplates>
    <TreeDataTemplate DataType="models:Conference" ItemsSource="{Binding Teams}">
        <TextBlock Foreground="Red" Text="{Binding ConferenceName}" />
    </TreeDataTemplate>
    <TreeDataTemplate DataType="models:Team" ItemsSource="{Binding Players}">
        <TextBlock Foreground="Green" Text="{Binding TeamName}" />
    </TreeDataTemplate>
    <TreeDataTemplate DataType="models:Team" ItemsSource="{Binding Coaches}">
        <TextBlock Foreground="Green" Text="{Binding TeamName}" />
    </TreeDataTemplate>
    <TreeDataTemplate DataType="models:Player" ItemsSource="{Binding Positions}">
        <TextBlock Text="{Binding Name}" />
    </TreeDataTemplate>
    <DataTemplate DataType="models:Coach">
        <TextBlock Text="{Binding ProperName}" />
    </DataTemplate>
</TreeView.DataTemplates>
The new definitions for Player and Coach types are all good however we now have two Team data templates there. What will Avalonia do? In fact it will do a “first come first serve” so only one of your two types will get picked up: either players or coaches. You can play with commenting out the respective templates and re-running to see that sometimes you’ll get coaches and sometimes you’ll get players.
So how do we solve this? The solution comes with using polymorphism. Rather than making completely separate classes for both players and coaches we can join them in the class hierarchy by either having them inherit from a common base class or implement a common property. We then have an aggregated collection of the entire team Roster which has a type of that interface/base class type. At run time Avalonia will be able to look up the more specific class type and use the correct template to create the proper view. So in the end, using a common base class, we have our Template definitions in our XAML as below:
<TreeView.DataTemplates>
    <TreeDataTemplate DataType="models:Conference" ItemsSource="{Binding Teams}">
        <TextBlock Foreground="Red" Text="{Binding ConferenceName}" />
    </TreeDataTemplate>
    <TreeDataTemplate DataType="models:Team" ItemsSource="{Binding Roster}">
        <TextBlock Foreground="Green" Text="{Binding TeamName}" />
    </TreeDataTemplate>
    <TreeDataTemplate DataType="models:Player" ItemsSource="{Binding Positions}">
        <TextBlock Text="{Binding Name}" />
    </TreeDataTemplate>
    <DataTemplate DataType="models:Coach">
        <TextBlock Text="{Binding ProperName}" />
    </DataTemplate>
</TreeView.DataTemplates>
Two things to notice in the XAML. First we are back to only having one template for the Team type. Second, there is no explicit template for the Positions. Why? Because we made the positions a collection of type string Avalonia knows how to default that to a default TextBlock type. If it was of another type you would add a second DataTemplate for that type. If one wanted to be completely explicit, or change the presentation of the strings, they could add one more additional template definition:
<DataTemplate>
    <TextBlock Text="{Binding}" />
</DataTemplate>
With respect to the backing types, the team type which has the Roster property as a common base class type Person:
public class Team
{
    public string TeamName { get; set; }

    public ObservableCollection<Person> Roster { get; }

    public Team()
    {
        Roster = new ObservableCollection<Person>();
    }
}
A player class which inherits from our original Person class which also implements the Positions as an array of strings:
public class Player : Person
{
    public ObservableCollection<string> Positions { get; }

    public Player()
    {
        Positions = new ObservableCollection<string>();
    }
}
…and a coach type which adds a Title and the ProperName generator property:
    public class Coach : Person
    {
        public string Title { get; set; }

        public string ProperName => $"{Title}: {Name}";
    }
Which gives us the final UI we are looking for:
Avalonia TreeView with Full Hierarchy and multiple types in collection
Conclusion
In this editorial we can see the ways that we work with the TreeView. In later tutorials we can learn how to bind to the selected item(s) in other controls as well. The first big takeaway is that compared to WPF the style templates are laid out in a flatter XAML schema being driven by the types. The second takeaway is that while for each type you can create only one data template and therefore one collection to bind to, by using common base classes or interfaces you can still get a hierarchy with multiple data types.