


 2019-06-08
in
2019-06-08
in

 12 min read
Buttons are a pretty fundemantal UI element that we all must leverage. How does one go about interacting with and getting feedback from button clicks? It turns out there are multiple ways and there are no wrong answers but there may be some better answers than others. I’m going to go through the various ways one can intercept Button events, their feedbacks, and the pluses and minuses of each of those elements. You can find the final solution for this blog post in this Gitlab Repository . We are going to start with simple event actions that update a field in our view model. We will then look at how to wire in an asynchronous call to a dialog box to show handling feedback within the event handler. This will illustrate how Buttons that invoke besides directly changing a View Model field can be worked. The standard tutorial covers that case. The ways we will be attempting to wire up these buttons are:
- Responding to the Command via a simple Method on the View Model
- Responding to the Command via a Reactive Command response on the View Model
- Responding to a click event via XAML
- Responding to a click event via code
- Responding to a other events
- Adding Asynchronous Handlers
This is a long post so you may want to jump to the specific section of interest after you’ve completed the setting up of the project , or jump right to the conclusion .
NOTE: This article is from 2019 and Avalonia has been under active development and improvement since that time. Please consult newer tutorials and documentation for how to use this against current releases of Avalonia.
Update 9 June 2019: There is a second related post on advanced button binding that may be interesting to you as well.
Setting up the project
Let’s first start by laying down some boiler plate code before we start getting into the guts of each of the buttons.
Create the project
Create a new project as shown in the Hello World Example
dotnet new avalonia.mvvm -o ButtonBindingExample -n ButtonBindingExample
cd ButtonBindingExample/
dotnet new sln
dotnet sln add ButtonBindingExample.csproj
Update the View Model To Have a Status Property
Update the MainWindowViewModel to have Reactive string property for capturing the response from the button push. You will need to add a using ReactiveUI; in the imports for the RaiseAndSetIfChanged. This will allow us to wire this property to our text field and have updates get pushed to the subscribing controls whenever it changes (lines 10 throuh 15). We will also want to have a common method for updating this status property from our button before we start doing real callbacks. To do that let’s implement a simple method which will use string interpolation to update the string property with the name of the updater (lines 17 through 20):
|
|
Lay Down View Boilerplate
Update the MainWindow.xaml View to have Buttons for our various example types and the TextBox which will hold the status from our buttons. We will want a button for each of the ways we are going to attempt to do the event handling. We will also be applying some styling to the buttons to make them look separate from each other. You can see the styling in the Grid.Styles Section.
|
|
When you compile and run the code you will see something like the below picture. Everything is rendering but the buttons don’t do anything yet. Now let’s look at wiring up each of the buttons.
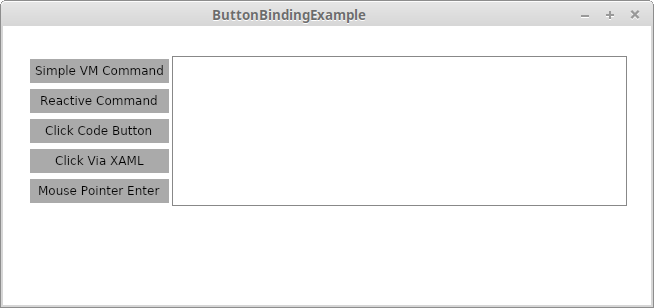
ButtonBindingExample Running on Linux
Simple Method on View Model
The simplest way for us to implement a button reaction to a being pressed is to implement a simple method on the View Model and bind it to our button. We will add a method called UpdatedFromSimpleButton to our view model:
public void UpdateFromSimpleMethod()
{
    UpdateTextStatus("Simple Method Button");
}
and our Button XAML code now looks like:
<Button Grid.Row="1"
        Grid.Column="0"
        Content="Simple VM Command"
        Command="{Binding UpdateFromSimpleMethod}"/>
All we’ve done is add the Command property which gets invoked when we press a button and bound it to the simple method. Now when you run the app you will see the field updating with the text like Simple Method Button updated me at $6/8/19 3:02:16 PM. This is by far the easiest, and I think often preferrable way to do this.
Reactive Command
Reactive Commands are a common way to respond to activities coming from the View by binding them to commands or to create other complex behaviors in your application. By simply creating a field that holds our Reactive Command object we can create the same behavior, with a little more complexity, as our simple command. Why would we add more complexity? In this case it doesn’t make sense to, however there may be cases where the more complex behavior is necessary for other purposes. The updated View Model code is below. First we will add our new Property to the View Model Class on line 34. The types like Unit won’t be imported yet but that is solved by bringing in the using System.Reactive; on line 4. Next we need to build this new property which will be done in the default constructor (lines 18 through 22). We create a simple lambda function which calls our UpdateTextStatus method, just like our simple method did, which then changes the text.
|
|
Like with our Simple button to get this working we simply add the Command binding to our Button definition in the XAML file:
    <Button Grid.Row="2"
            Grid.Column="0"
            Content="Reactive Command"
            Command="{Binding UpdateTextFromReactiveCommand}"/>
Binding to a Click Event in XAML
Up until now we’ve been binding our buttons to View Model code. In the next several examples we will working with code within our View, not the View Model. We also will be dealing with event handling not just function binding. There are two big differences here. First, we will need to be manipulating the DataContext of our view. The type of this is a generic object however we will need to have more type specific information to get to the property we are trying to manipulate. Second, the function signature of an event handler and the function binding is different. These are like your standard events so take a signature of something like public void MethodName(object sender, SomeArgsType args). When we tell the system that we want a specific event type to be handled the setting not only has to correspond to the name of our method, like above, but also the function signature of the specific event type. For the click event that signature uses the type RoutedEventArgs. You can see the resulting code below. So first, let’s make our View Model aware of the data specific DataContext. To do this we are going to create a private property that will cast our generic DataContext into the View Model Specific variant on line 12. Next we create a new event for our button click which corresponds to the function signature (lines 24 through 27).
|
|
Binding to a Click Event in Code
Perhaps we don’t want to bind to an event in the XAML. In that case we can do the same behavior via code. All we are going to do is add a new event handling delegate to our button object directly in code. How do we find that button object? Ah! As you may have noticed on many of the UI elements in the XAML some have a Name property. Like in HTML DOM this property as a unique identifier will allow us to find that element by using a method on our window called FindControl. With a reference to the control we can then add our event handler like in traditional .NET UI frameworks. We will do all of this in the View’s constructor after we initialize our component. The corresponding updated constructor code is below.
public MainWindow()
{
    InitializeComponent();
    var clickCodeButton = this.Find<Button>("ClickCodeButton");
    clickCodeButton.Click += delegate
    {
        SpecificViewModel.UpdateTextStatus("On Click Code Button");
    };
}
Binding to Other Events
Controls have many events that can be bound to. For each of them one has the choice to bind via setting the property in XAML or by doing it code, like we did above for the Click event. Common ones which people may be interested in are things like:
- PointerEnter: When the pointer enters a control
- PointerLeave: When the pointer leaves a control
- Tapped: When a user taps on the screen over the control
- PointerPressed: When a user releases the pointer
The complete list of applicable events for the Button class can be found in the main documentation, here
. An example of adding a PointerEnter event to the last button via XAML can be with the below additional method in the code and the change to the button’s XAML code. Note that the name of the property in the XAML is exactly the same as the event name. Also note that the type of the second argument in the event handler we wrote is now PointerEventArgs not RoutedEventArgs like in the Click case. If the event name in the XAML is wrong, or the method name in the XAML doesn’t match the method name in the code, or the type of the second argument is not consistent with the event handler it will not execute properly.
private void OnPointerEnter(object sender, PointerEventArgs e)
{
    SpecificViewModel.UpdateTextStatus("On Pointer Entered Button");
}
<Button Grid.Row="5"
        Grid.Column="0"
        PointerEnter="OnPointerEnter"
        Content="Mouse Pointer Enter"/>
Adding Asynchronous Handlers
Now that we’ve gone through the various ways to connect handlers to events or command binding, what happens when we want to do some more complex behaviors. Let’s say for example that we want to let the user select a file off the disk to process? How do we go about doing that correctly and responsively? The way to do this is with asynchronous methods, the so-called async/await idiom. Essentially we want to make sure that our application doesn’t look frozen when we wait for our dialog box selection to happen. Microsoft has some great documentation of this here . By implementing this method we can replace all our methods with this and have our updates be the user selected folder rather than our original update string. Below is the code that we add to the View Model to make this happen (since we want to use it in both the View Model and View):
|
|
The OpenFolderDialog is a standard Avalonia control that we can use for selecting a folder. There is a corresponding File dialog as well. We mark the method as async in line 1 where we define it so that we can use the await capability within our code method. On line 9 we can see where we actually show the dialog box and then “await” for the result to come back. Without the “await” we will come back instantly with a result from the method, which is not a value of the user selection but the handler for waiting for it etc. The “await” is providing us our mechanism for waiting for a result without locking up the whole UI. Finally, if there is no result then the user selected to hit “Cancel” or dismiss the window without selection. If it isn’t null it’s the user’s selection. We can then replace the original UpdateTextStatus with the SelectFolderAsync as a one-for-one replacement. Try replacing any of the button commands with the new async method and see the results.
Conclusion
Wow that was a lot of minutia about buttons and none of it was especially hard. The fact that there are multiple ways of doing things can make things seem unnecessarily complex when first starting. Which way is better than others, which way is “the right” way. That’s really going to be up to the developer to decide. By having these all presented in one common place I’m trying to create a good reference with side-by-side views of how one can go about working with Buttons and their event handling within Avalonia. Which way do I use when I have the choice between them? I generally will use the first method “simple in simple UIs. However in cases where I am working with general event handling I prefer to use the binding through XAML to events method because it doesn’t have the association of the control to the event handler in the code. The bookkeeping of that is far cleaner to me.